Organizing and editing a feature documentary shot over 3 years (Part 1)

For the past few years, I have been working on a feature documentary called Born to Fly about prodigy pole vaulter Armand “Mondo” Duplantis. If you are interested in a behind the scenes look into the film, please visit the Born to Fly page on my website or follow the film on Instagram and Facebook.
In making this documentary, I learned many things through error, and figured I could take that new knowledge and help others in navigating these waters. With almost a year left of shooting, I am closing in on 2000 hours of footage. Needless to say, by the end of it, this will be the largest project I have ever worked on.
I chose to work with Premiere CC as that is the program I am most familiar with, but I promise the vast majority of these tips
A: Don’t involve the editing program
B: Will crossover in some way if they do
Also, I would like to preface this with one statement. I am in NO WAY a professional editor. Editing this film was born out of necessity, lack of budget, and my familiarity with the subject matter. I generally detest tutorials/guides on the internet made by someone with a half-baked knowledge on the topic, but I struggled to find anything of this sort anywhere.
If reading some of my choices make you cringe, please leave a comment so others can learn a better technique. If we work together, we can make an intuitive guide that all can follow. Here is my attempt, warts and all.
So, with that said, let’s dive into it:
Because I am shooting a documentary and not a narrative film, I don’t necessarily have scenes with scene numbers. I do, however, have locations and themes/topics/events. When, it came to dumping and organizing footage on my RAID, I chose to number the folders based on the date. I then added a short description so I would immediately know the main things that happened during that day.

This is a small sample of the 90+ days I’ve shot. You’ll see the advantage of labeling the folders as such instead of just calling it “Day 1, Day 2, etc” in a minute.
I will still be adding folders and footage as the filming continues, but I have a system that I will stick to, and that’s the most important note I can give about this whole process: consistency.
Now, setting up the rest of your folder structure is pretty subjective. This is personally how I do it:

I won’t go into too much detail about these general folder structures as there are many resources out there like this video from Film Riot. I know some people will make a master “Adobe” folder for all Premiere, After Effects, and Photoshop. I just make a “PP Files” folder for Premiere and a separate folder for my master edit.
Now the fun stuff.
After shooting so many hours, I knew I had to figure out a way for me to view all the footage easily and then create notes/markers for easy access later down the edit road.
I decided to go with reels based on each day/folder. For example “10_MT. SAC_4.15.17” as seen above - that folder contained about 1 hour and 45 minutes worth of various 4K footage during a track and field meet. I created a sequence titled the same as the folder and laid out all the clips into it. Then, in the export, I added a timecode overlay (generated starting at 00:00:00) and a simple Rec 709 lut since I shot in Slog 3.
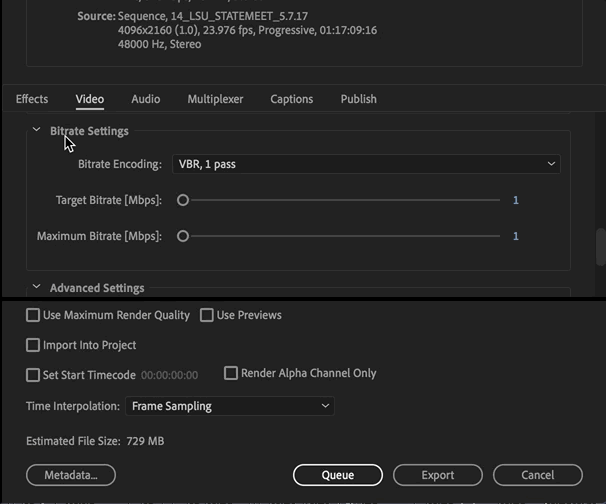
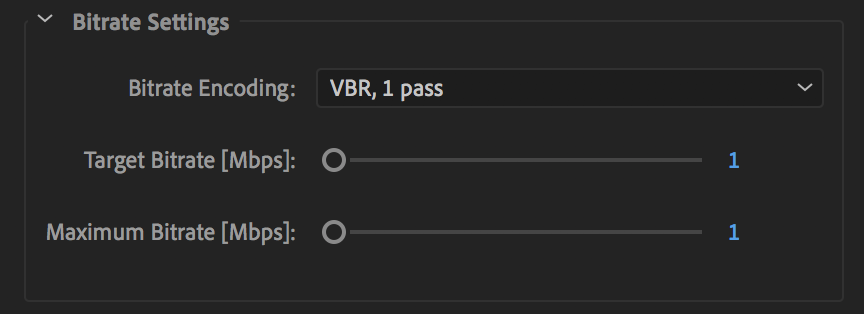
But adding the Clip Name to the top of the video did not work correctly on the export settings, so instead I added an adjustment layer in the timeline and added the Clip Name effect.


I picked a super low resolution (h.264 1024x540p at a target bitrate of 1mbps) and exported.

The final product looked like this:

The file came out to 1Gb in size, much smaller than the 128Gb that was the original footage. It didn’t matter that the quality was poor, as long as I could still judge the shot. This made me an easily accessible “reel” that I could scrub through at any time and watch hours of footage without bogging down the computer. It was the only way in my mind I’d be able to watch all the footage I’d shot.
Okay, but watching the footage means nothing if I’m not writing anything down… And this is where my process gets more specific to Premiere, but I’m sure there are similar ways to do it in Final Cut or Avid.
I became very frustrated with Premiere in how it handled clip markers. For whatever reason, exporting multiple clip markers at one time is not possible, forcing you to export them 1 by 1. I won’t belabor the point, but it was very frustrating.
So, that left only timeline/sequence markers.
Make sure you have ripple edit markers and copy paste checked off during this process.

The method I chose was to create timeline markers that were as detailed as possible. I could take you through the trial and error process of how I got to that point, but I’ll save that for the more in depth video.
For now, I will just show you where I ended up - each marker would be named a number between 0-5. In essence:
0: Dud shot
1: Bad
2: Average
3. Good (potentially important material that wasn’t shot perfectly. Could be used)
4. Very good
5. Excellent (the golden moments I know will most likely be in the final cut)
I also chose not to delete any clips, even if rated poorly. I found no reason to delete something I potentially rated low before gaining more context later in the shoot.

The first thing I did was rate the shot 0-5 as the marker name. In the above example, the shot was rated a “4”. After a description of the shot, I color coded it.
My color code scheme consisted of:
0: RED
1: ORANGE
2: ORANGE
3: YELLOW
4: GREEN
5: GREEN
Here is an example of what a timeline looks like after all the markers are placed.

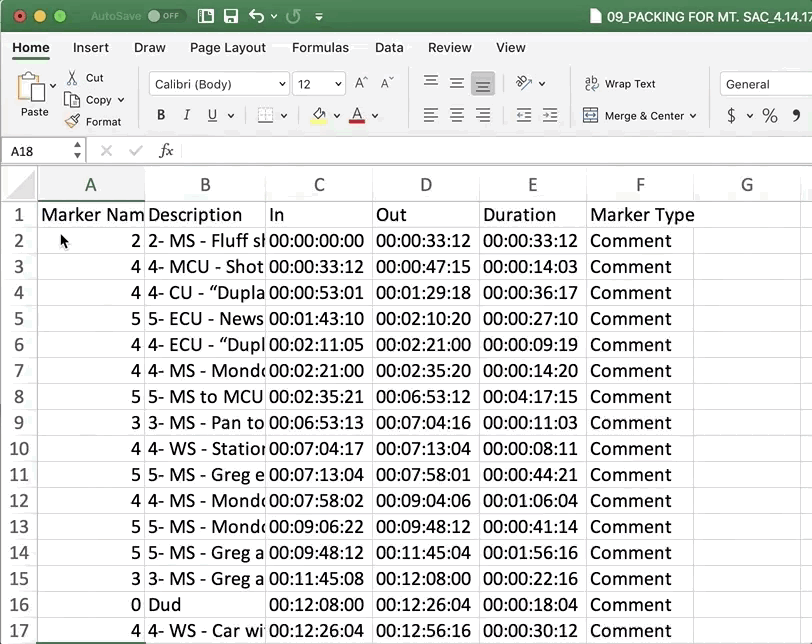
When exporting timeline markers out of Premiere, I used the .csv format and saved them to a folder labeled the exact same as the original footage folder. I then put that new folder in my “Master Edit” folder. Inside each, would include the .csv of markers for that sequence, and the low-res .mp4 reel. Everything had the exact same names - again, consistency.
For example:
Inside my “Markers” folder, I have an 09_PACKING FOR MT. SAC_4.14.17 folder (same name that holds the raw footage). Within that folder is the .csv and the .mp4 reel.

Now, exporting markers out of Premiere does not preserve the color code unfortunately, so I created a conditional formatting in Google Sheets that acted the same as my Premiere color code. So, when I pasted the information from the .csv into Google Sheets, it automatically color coded it based on the parameters I set.

A quick tutorial on conditional formatting in Google Sheets:
It is easier in Excel, but I wanted to have access online and share with collaborators down the line, so I chose Google Sheets.
First, at the top bar, select Format and then Conditional Formatting

What conditional formatting allows you to do, is set a style of format for a cell or group of cells that is dependent on a condition. Seems simple enough.
What I used it for, was to color code my cells depending on the number that the shot was rated. In essence, if the shot was rated a “4”, it would automatically color it green, etc.
Again, I am not a spreadsheet wizard, so if you are reading this and know of a simpler or faster way to accomplish the same goal, please let me and the others reading know!

Below is how I set-up my conditional formatting parameters. Column “B” in my spreadsheet became the “Rating” column, where all shot rating numbers were put.

In this example, I create a conditional formatting rule that states “B3:B - Text starts with - 3 - Color yellow”
By putting it as B3:B it will automatically select all cells B3 and below. In my case, the spreadsheet is 2906 rows, so that’s why it auto chose that number.
The idea here, is that when a shot is rated a “3” in column “B” it will color code it yellow. I did the exact same thing for the other numbers, just changing the number and color. So, for example, if the shot was rated a “5”, I wrote. “B3:B” in the “Apply to Range” section. Then selected “Text starts with” and wrote “5”. Then picked the color green.
This only will color Column “B” however. In order to color column “C”, (the column where I put my shot descriptions) I had to write another conditional format rule.

In this example, I am now working with the C3:C range. Again, this will automatically select C3 and below - my spreadsheet just happens to end at row 2906.
The difference between this conditional format and the one before, is that this one is now dependent on a different row. We are not creating a rule based on what content is in column C, but rather what is in column B. So, instead of picking “Text starts with” in format rules, I pick “Custom Formula”.
In the above case, I am using the shot rating of “3” again. So I will use that to explain. The formula is =B3=”3”
This formula tells the spreadsheet that if column B3 (and below) equals the number 3, then color cells C3:C2906 yellow. It is basing the condition of column C on the details of column B
The same can be applied for the other colors. So, for a rating of “5”, I wrote =B3=”5”
Then selected the green color I use for shots rated a “5”
With my new timeline markers pasted into a spreadsheet and color coded, I’m able to better visualize my film. And this is where the pairing of my timeline markers and the low-res reels come to play.
Let’s say I’m looking for one of the shots of Mondo packing his poles on top of the car. I remember that we had a great shot in my 09_PACKING FOR MT. SAC_4.14.17 folder. So, I navigate to those markers on my spreadsheet and find the shot I’m looking for. It’s rated a “5” and colored a darker green.
The exact description I used was “MS to MCU - Multiple different shots of Mondo attaching poles to roof. Interaction with Greg. Lamenting on the woes of carrying poles.”


I look at the timecode and see that this clip starts at 00:02:35:21 and lasts until 00:06:53:12. Now, I will go to the reel for 09_PACKING FOR MT. SAC_4.14.17 and navigate quickly to that timecode.

I go to about the 03:30:00 mark because I know the good stuff starts there - and because I burned the Clip Name to the top of the image, I know that the clip name for this shot is B014C017_etc.MXF.
Again, this is where I get frustrated with Premiere for not allowing me to mass export clip markers. It would make this process a bit shorter by having the notes directly attached to the clip name rather than the timeline. I’ve sent in the request.
Regardless, the whole process takes less than a few seconds, so I can’t complain too much. I find the clip I want in the spreadsheet, navigate to it on the reel, and find out the clip name.
If working directly in Premiere, I can do the same, because all the timecodes match up.

In this GIF, I navigated from timecode 00:03:26:00 to 00:03:45:00 to pull a 20 second clip into my master edit sequence.
In the next installment, I will go into my proxy workflow, and how I plan to edit the entire first cut of the film on paper before taking it into Premiere.
Brennan Robideaux is the director of Born to Fly, a documentary tracking the story of pole vaulter Armand “Mondo” Duplantis who rose to fame as a toddler breaking world records and continues his quest to become the greatest vaulter of all time.
You can follow me on: